Spring Boot 整合 Thymeleaf 轻松开发 web 页面
一、简介
在之前的文章中,我们简单介绍了 Thymeleaf 模版引擎的使用方式,可以利用它来快速开发 Web 页面。
虽然 Java 生态中开源的模板引擎非常的多,比如除了上文介绍的 Thymeleaf 之外,还有 FreeMaker、Velocity 等,但是相比较而言,在 web 页面应用领域,Thymeleaf 模版引擎有以下几个优点:
- Thymeleaf 选用 html 作为模板,其模板语法并不会破坏文档的结构,不管有没有网络,都可以正常运行
- Thymeleaf 具备开箱即用的特性,同时它支持 spring 标准方言,可以直接套用模板实现 JSTL、 OGNL 表达式效果
- 被 Spring Boot 官方推荐和支持,Spring Boot 为其做了很多默认配置,开发者只需编写对应 html 即可,配置简单并且易上手
本篇文章,我们将围绕 Thymeleaf 模版引擎,更加详细的介绍它的用法。
话不多说,上代码!
二、应用实践
2.1、添加相关依赖包
如果 SpringBoot 项目中没有 Thymeleaf 工具库,需要在pom.xml文件中添加相关依赖包,示例如下:
<!--web 依赖库-->
<dependency>
    <groupId>org.springframework.boot</groupId>
    <artifactId>spring-boot-starter-web</artifactId>
</dependency>
<!--thymeleaf模板引擎-->
<dependency>
    <groupId>org.springframework.boot</groupId>
    <artifactId>spring-boot-starter-thymeleaf</artifactId>
</dependency>
2.2、参数配置
正如上文所说,Springboot 官方对 Thymeleaf 做了很多默认配置,其内容有以下:
spring.thymeleaf.cache=true # 是否启用模板缓存,默认:ture
spring.thymeleaf.check-template=true # 在呈现模板之前检查模板是否存在,默认:ture
spring.thymeleaf.check-template-location=true # 检查模板位置是否存在,默认:ture
spring.thymeleaf.enabled=true # 是否启用MVC Thymeleaf视图分辨率,默认:ture
spring.thymeleaf.enable-spring-el-compiler=false # 是否启用Spring el表达式,默认:false
spring.thymeleaf.encoding=UTF-8 # 模板编码,默认:UTF-8
spring.thymeleaf.excluded-view-names= # 应该从解决方案中排除的视图名称的逗号分隔列表,默认:空
spring.thymeleaf.mode=HTML # 应用于模板的模板模式,默认:HTML
spring.thymeleaf.prefix=classpath:/templates/ # 设置thymeleaf模板文件路径
spring.thymeleaf.suffix=.html # 设置thymeleaf模板后缀
spring.thymeleaf.servlet.content-type=text/html # 设置http响应类型
spring.thymeleaf.template-resolver-order= # 链中模板解析器的顺序,默认:空
spring.thymeleaf.view-names= # 可以解析的视图名称的逗号分隔列表,默认:空如果我们想自定义其中的参数配置,可以在application.properties文件中,添加相关参数即可,示例如下:
# 缓存设置为false, 这样修改之后马上生效,便于调试
spring.thymeleaf.cache=false
# 指定模板编码
spring.thymeleaf.encoding=UTF-8
# 指定模板文件扫描路径
spring.thymeleaf.prefix=classpath:/templates/
# 指定模板文件后缀
spring.thymeleaf.suffix=.html
2.3、常用标签
thymeleaf 支持通过标签来识别并渲染数据,默认支持的标签特别多,功能也很丰富,这里我们列举一些常用的标签,内容如下:
| 标签 | 作用 | 示例 |
|---|---|---|
| th:id | 替换 id | <input th:id="${user.id}"/> |
| th:text | 文本替换 | <p th:text="${user.name}">desc</p> |
| th:utext | 支持html的文本替换 | <p th:utext="${user.html}">desc</p> |
| th:object | 替换对象 | <div th:object="${user}"> |
| th:value | 替换值 | <input th:value="${user.name}" /> |
| th:each | 迭代 | <tr th:each="prod:${users}" > |
| th:href | 替换超链接 | <a th:href="@{user/{userId}(userId=${user.id})}">超链接</a> |
| th:src | 替换资源 | <script type="text/javascript" th:src="@{user.js}" /> |
几个常见标签的使用方法,模板页面示例如下!
<!DOCTYPE html>
<html lang="en">
<head>
    <meta charset="UTF-8">
    <title>Title</title>
</head>
<body>
    <p th:id="${user.id}">id替换</p>
    <p th:text="${user.name}">内容替换</p>
    <p th:utext="${user.html}">html替换</p>
    <input th:value="${user.name}" />
    <a th:href="@{user/{userId}(userId=${user.id})}">超链接</a>
    <table>
        <thead>
        <tr>
            <th>用户ID</td>
            <th>用户名称</td>
        </tr>
        </thead>
        <tbody>
        <tr th:each="prod:${users}">
            <td th:text="${prod.id}">1</td>
            <td th:text="${prod.name}">测试</td>
        </tr>
        </tbody>
    </table>

</body>
</html>对应的controller类请求接口如下:
@Controller
public class HelloController {


    @GetMapping("/index")
    public String index(ModelMap map) {
        // 定义集合
        List<User> users = new ArrayList<>();

        // 定义对象
        User user = new User();
        user.setId(1);
        user.setName("张三");
        user.setHtml("<strong>张三</strong>");

        users.add(user);
        // 绑定元素
        map.addAttribute("user", user);
        map.addAttribute("users", users);
        return "index";
    }
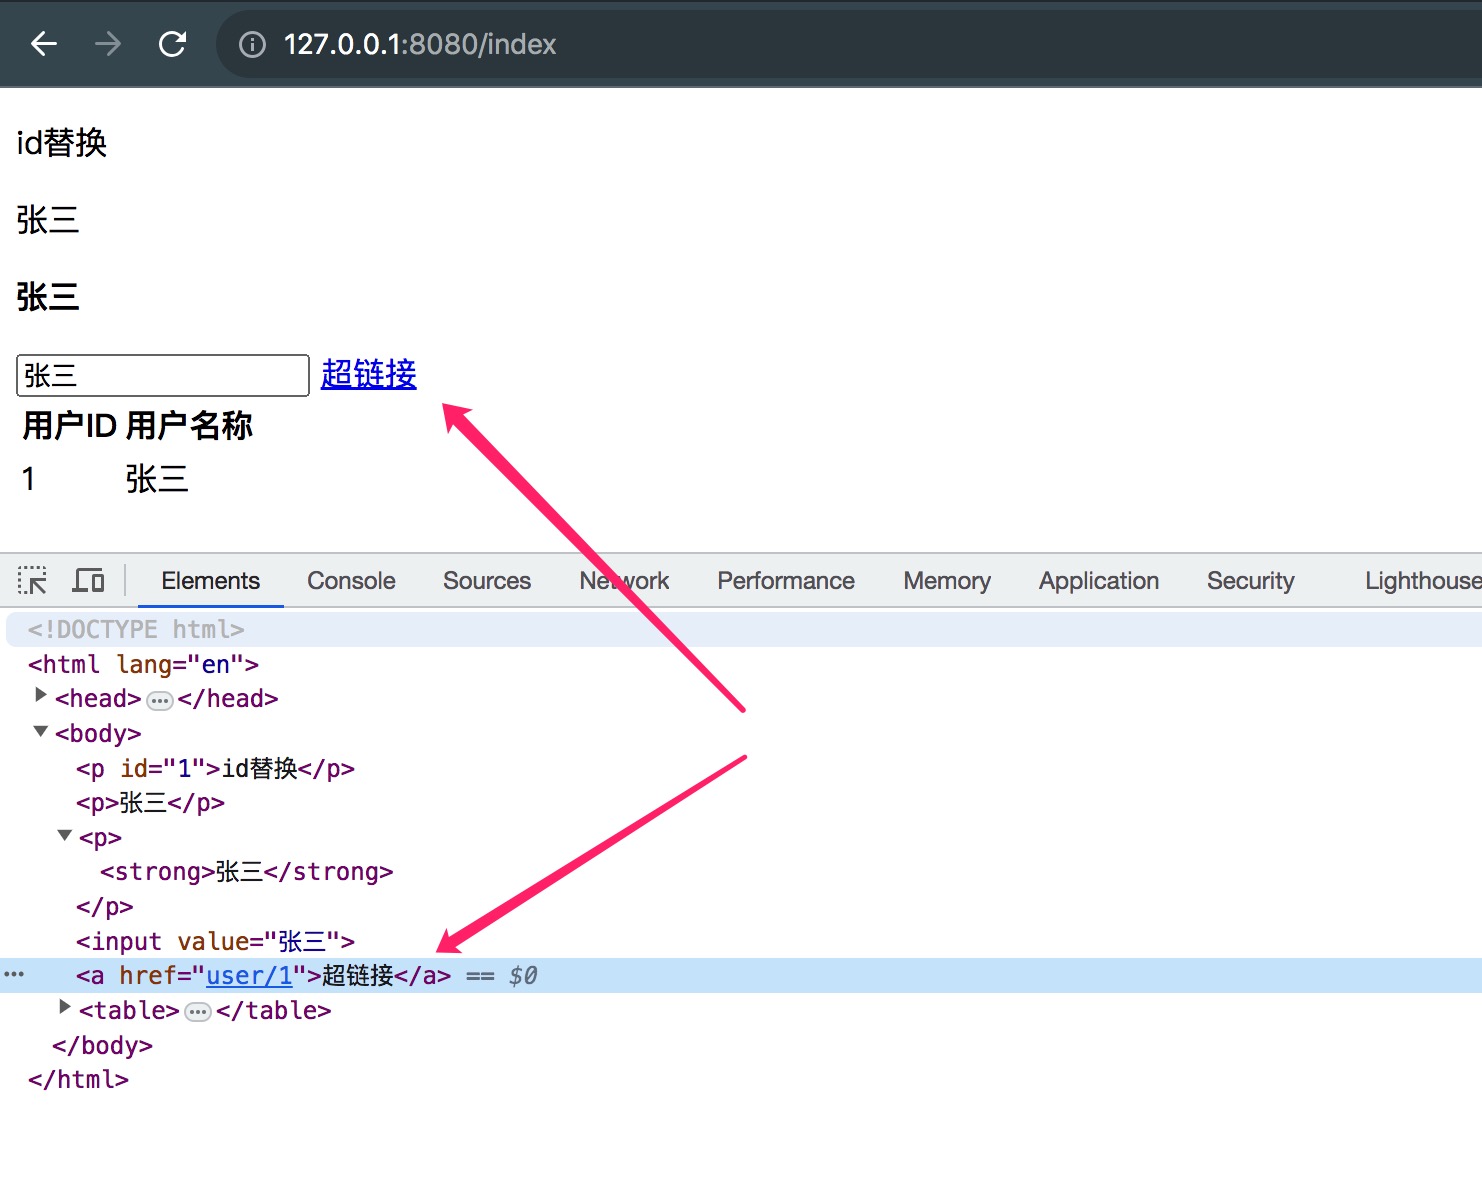
}启动服务,在浏览器访问http://127.0.0.1:8080/index地址,展示结果如下:

2.4、相关表达式语法
在 Thymeleaf 中有四种类型的表达式,可以实现数据的视图渲染,分别为:
- 变量表达式
- 选择变量表达式
- 文字国际化表达式
- 链接表达式
下面我们一起来看看具体的应用方式。
2.4.1、变量表达式
变量表达式,即 OGNL 表达式或 Spring EL 表达式,操作非常简单,通过${…}方式直接取值,它可以取ModelMap中定义的所有变量,例如如下示例:
<p th:text="'您好 '+${user.name}"></p>2.4.2、选择变量表达式
选择变量表达式,与变量表达式类似,稍有不同的是它支持选择一个预定对象来表达数值,通过*{…}方式来表达,例如如下示例:
<div th:object="${user}">
    <p>id: <span th:text="*{id}">1</span>.</p>
    <p>name: <span th:text="*{name}">名称</span></p>
</div>
与下面通过变量表达式来取值,效果完全一致
<div >
    <p>id: <span th:text="${user.id}">1</span>.</p>
    <p>name: <span th:text="${user.name}">名称</span></p>
</div>
2.4.3、文字国际化表达式
文字国际化表达式,指的是 thymeleaf 允许我们从一个外部文件(例如. properties文件)获取相关的配置信息,通过#{…}方式来表达,使用过程如下。
首先在src/main/resouces/config目录下,创建一个home.properties文件,内容如下:
address.province=湖北省
address.city=武汉市然后,在application.properties 中加入以下内容:
spring.messages.basename=config/home最后,在模板页面上,通过表达式读取相关配置即可。
<h2>文字国际化表达式</h2>
<table>
    <tr>
        <td>省</td>
        <td th:text="#{address.province}"></td>
    </tr>
    <tr>
        <td>市</td>
        <td th:text="#{address.city}"></td>
    </tr>
</table>
2.4.4、链接表达式
链接表达式,指的是把一个有用的资源地址添加到模板页面中,其中资源地址可以 是 static 目录下的静态地址,也可以是互联网中的绝对地址。通过@{...}方式来表达。
例如引入超链接资源,示例如下:
<a th:href="@{user/{userId}(userId=${user.id})}">超链接</a>引入 css 资源,示例如下:
<link rel="stylesheet" th:href="@{main/index.css}">引入 javascript 资源,示例如下:
<link rel="stylesheet" th:href="@{main/index.js}">表单提交路径,示例如下:
<form th:action="@{/createOrder}">2.5、JavaScript 内联
某些场景下,如果想在 JavaScript 中获取相关的变量,如何实现呢。
操作其实也很简单,首先在脚本上添加th:inline="javascript"配置,然后通过[[...]]来表达内容值,示例如下:
<script th:inline="javascript">
    var msg = [[${user.name}]];
    alert(msg);
</script>
当访问页面的时候,会弹出相关的内容值。
除此之外,Thymeleaf 还提供了一系列 Utility 对象,开发者可以通过#直接访问,比如获取时间的操作。
<script th:inline="javascript">
    // 获取当前时间
    var dateStr = [[${#dates.createNow()}]];
    alert(dateStr);
</script>
三、小结
最后,如果想要了解更多的用法,可以访问 thymeleaf 官方文档,地址如下:
https://www.thymeleaf.org/documentation.html中午开发者文档地址如下:
https://www.docs4dev.com/docs/zh/thymeleaf/3.0/reference/本文主要围绕利用 thymeleaf 实现快速开发 web 页面时的应用方式,进行了一次知识内容的整理,如果有描述不对的地方,欢迎留言支持。
四、参考
1.https://www.thymeleaf.org/download.html
2.https://zhuanlan.zhihu.com/p/163391278
3.http://www.ityouknow.com/springboot/2016/05/01/spring-boot-thymeleaf.html
作者:潘志的技术笔记
出处:https://pzblog.cn/
版权归作者所有,转载请注明出处
